 • PhotoTraces")
[ad_1]
If you wish to perceive how you can batch edit in Lightroom, you’ve come to the fitting place.

By now, just about each Lightroom person is aware of that preset-based modifying is the quickest and best approach to edit a lot of images in Lightroom. To do that, you document your commonest modifying steps as a preset which you could later reuse by making use of its results to a number of images.
For instance, once you return house from a day-long shoot and must course of lots of of images. You normally begin by deciding on one photograph that you simply spend time growing. As soon as you might be pleased with the outcomes, you save all of the modifying steps as a preset so you may apply it to the remainder of the images.
However how you can apply that preset to a number of images in Lightroom is just not precisely apparent.
Within the Develop Module, if you choose a number of images within the filmstrip and attempt to apply the preset to all of them, Lightroom solely applies the preset to the energetic picture displayed within the Loop View. The preset is just not utilized to the remainder of the choice.
That is when batch modifying turns out to be useful.

Let me present you a number of choices on how you can use batch modifying in Lightroom together with presets.
Tips on how to Batch Edit in Lightroom – 7 Strategies
1. Use Synchronization Technique in Develop Module
Begin by making use of the preset to the energetic picture within the Develop Module. The energetic picture is the picture you see above the movie strip as the big preview.
Subsequent, choose a number of photos within the filmstrip whereas guaranteeing that the unique picture stays energetic.
With a number of photos chosen, hit the ‘SYNC…’ button on the backside proper of the modifying panel.

When you hit the ‘SYNC…’ button, the Synchronization Settings panel will pop up, the place you may choose which parameters you need to synchronize.

For instance, you would possibly deselect the Publicity checkbox as a result of you’ll seemingly must tweak the publicity settings for every picture individually. One other widespread choice to deselect is the Crop Overlay since uniformed cropping isn’t used throughout a number of images.
As soon as you might be completely satisfied along with your choices, press the ‘Synchronize’ button and wait because the Lightroom batch processes all the chosen photos by making use of similar growth settings to every of the pictures.
There are some disadvantages to this methodology:
- In the event you utilized some extra modifying steps to the unique picture after making use of the preset, synchronizing will use the identical mixed impact.
- Within the Historical past Panel, you’ll find the Synchronize Settings entry however this is not going to let you know what actual preset was used.
2. Use ‘Auto Sync’ to Edit A number of Photographs Concurrently
The ‘Auto Sync’ is a variation of the ‘Sync’ batch modifying methodology I lined above. However, you edit all chosen images concurrently as an alternative of modifying one picture and making use of carried out modifying steps to the reset utilizing the ‘Sync’ performance.
Let me clarify.
Within the Develop Module, choose a number of images you plan to edit.
Subsequent, find a little change subsequent to the ‘Sync’ button under the fitting modifying panel of the Develop Module.
If you flip the change, the ‘Sync’ button will flip to ‘Auto Sync.’

Now once you edit any chosen images, all of the changes can be utilized to the complete group of photos.
The ‘Auto Sync’ butch modifying methodology may be useful when modifying a bunch of images taken within the management setting, akin to studio settings.
However I discovered that ‘Auto Sync’ is just not very useful for panorama or journey pictures. I want the #1 ‘Sync’ methodology as an alternative.
3. Use Earlier Technique in Develop Module
That is one other approach to make use of batch processing within the Develop Module. To be extra correct, we should always name this—semi-batch processing.
See additionally: Tips on how to Set up Lightroom Presets
On this methodology, you apply the preset to the energetic photograph within the Develop Module. As soon as you might be executed making any extra edits, you may click on on one other picture within the filmstrip to make it energetic.
Subsequent, hit the ‘PREVIOUS’ button on the backside proper of the growing module’s modifying panel. All of the modifying steps from the earlier picture will now be utilized to the energetic picture.

It’s not exactly batch processing, however this methodology may be useful when modifying a number of images in Lightroom that require minor changes for every picture.
For instance, you apply the preset to the energetic picture first. Subsequent, you alter the publicity and distinction earlier than shifting to the subsequent picture. Utilizing the PREVIOUS button, you may shortly undergo a lot of photos to make sure every picture has the personalized settings you like.
4. Batch Edit A number of Photos in Import Module
An alternative choice to use a preset to a number of images is to make use of it in the course of the preliminary strategy of importing photos into the Lightroom Catalog.
You may have varied import choices when you find yourself able to import a number of images into Lightroom. Below the Apply Throughout Import panel within the Import Module, you may specify what Develop Preset to use to all the pictures by deciding on the suitable preset from the Develop Settings drop-down menu.

For instance, you might need to apply the Lens Correction preset to your new photos.
Once I was taking pictures with Sony, I created a devoted develop preset with Lens Correction changes solely, and I used it on each photograph I used to be bringing to Lightroom. Since I’m taking pictures with Fujifilm now, this step is pointless as a result of Lightroom routinely applies the Lens Correction changes to Fujifilm RAW photos.
Or, for the reason that AI modifying choices in Lightroom at the moment are extra highly effective, you may apply Auto Tone Changes to all of the images in the course of the import to Lightroom. Lightroom calculates and makes the preliminary tone changes for each imported picture.
3. Batch Edit Utilizing Fast Develop Technique in Library Module
Use the ‘G’ keyboard shortcut to change from the Develop Module to the Library Module in Grid View.
Choose a number of images within the Grid View by holding down the ‘Shift’ (‘Possibility’ on Mac) key. From the fitting panel, open the Fast Develop panel by urgent the triangular icon.
From the Saved Presets drop-down menu, choose one of many presets. The impact of the chosen preset can be utilized to all the chosen photos within the Grid View.

I not often use batch processing in Library Module. Sometimes, I would use it if I forgot to do it in the course of the import course of.
6. Batch Edit Copyright Data
The primary 4 strategies of batch modifying in Lightroom are associated to the Develop Presets. However, since Lightroom employs 9 several types of presets, you aren’t restricted to develop presets solely.
You’ll be able to batch edit a number of images so as to add additional metadata to each picture you convey to Lightroom.
The metadata is extra info that may be embedded into every photograph. For instance, the EXIF info (aperture, shutter pace, ISO, focal size, and so on.) is a part of the metadata. The photograph’s location, key phrases, and copyright info may also be saved within the metadata.
In my case, I add copyright info to each photograph in the course of the Lightroom import course of.
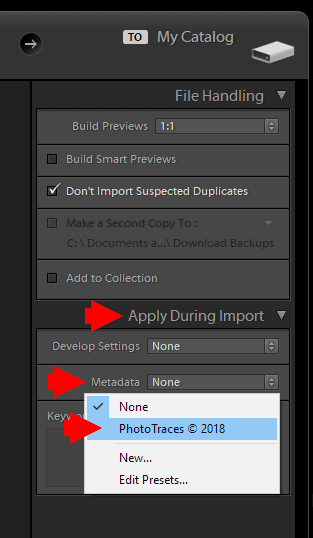
First, you have to create a Copyright Preset and reuse it within the Import Module on each batch of latest photos you convey to Lightroom.

For extra info on creating and utilizing the Copyright Presets, examine my devoted article right here: Tips on how to Create and Use Lightroom Copyright Presets.
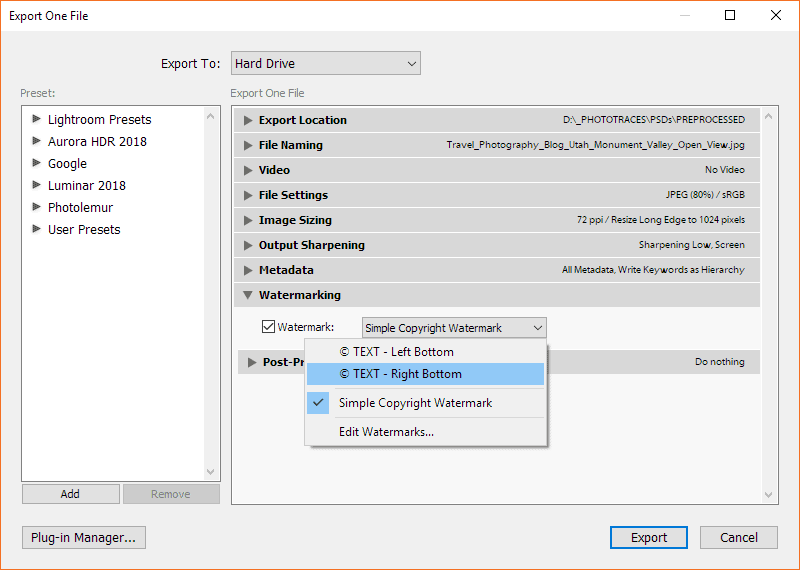
7. Apply Watermark to A number of Photographs on Export
I’m not a giant fan of watermarks. I consider that, normally, they damage images and their protecting impact is questionable. The explanation I take advantage of watermarks is for discovery functions. A watermark may be very efficient if somebody comes throughout certainly one of my images and needs extra details about the photographer or how you can buy it.
There isn’t any approach so as to add a watermark to any picture in Lightroom throughout growth. The one approach of doing that is in the course of the export. The unique photograph within the Lightroom catalog stays unchanged, however the watermark is added to JPEG (or different codecs) picture you export.
Earlier than including a watermark to exported photos, you have to create a Watermark Preset within the Watermark Editor and reserve it.
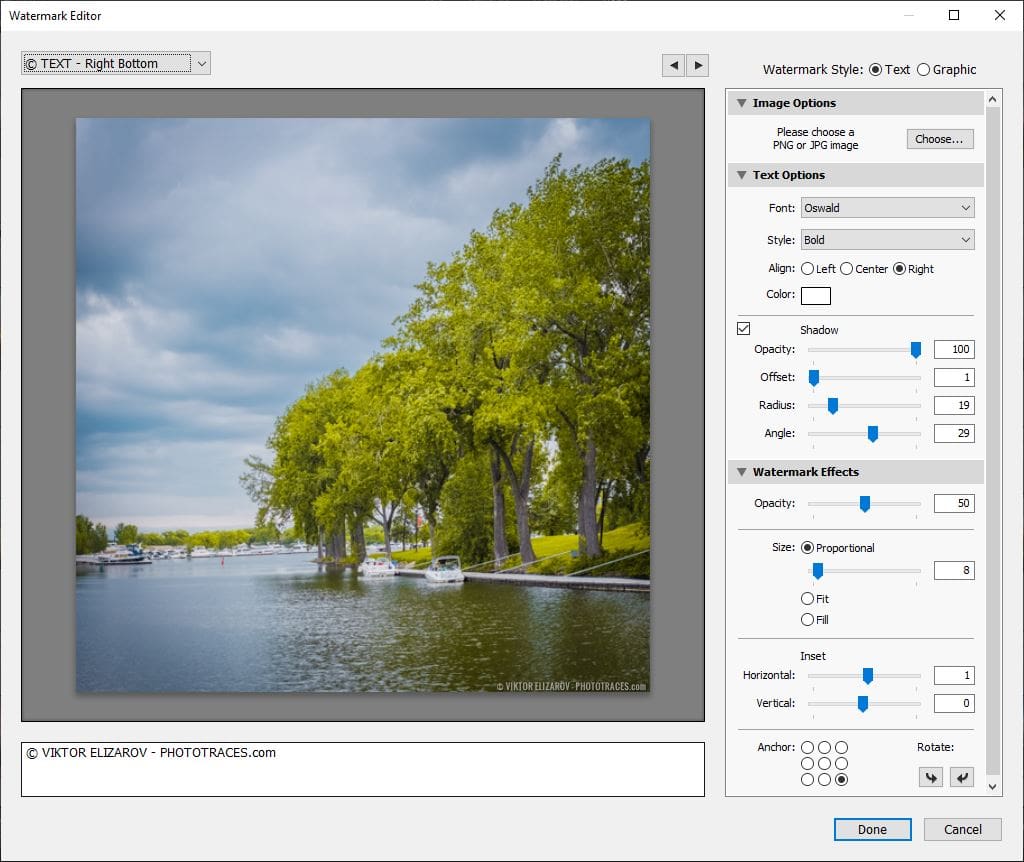
In my case, I solely have two Watermark Presets. Relying on the content material of the photograph, I choose one preset so as to add a watermark to the underside proper nook of the photograph. The second preset provides a watermark to the underside left nook.
You could find my in-depth tutorial on how you can create and use the watermark presets in Lightroom: Tips on how to Create and Use Watermark Presets in Lightroom.
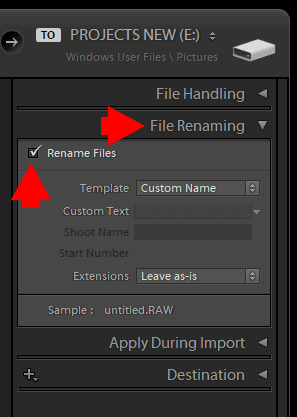
8. Batch Rename Photos in Lightroom
The ultimate batch modifying possibility permits you to rename the digital photos you convey to the Lightroom catalog.
It’s a extra obscure batch modifying possibility, and never each photographer makes use of it. However, I discover it’s useful for my digital workflow. I rename all images I import to Lightroom.
Let me clarify why I take advantage of batch renaming in my pictures.
Once I import a photograph to Lightroom with out altering the file identify, that is what I see in my photograph library:
_DSF0369. RAF
Right here is identical picture after I take advantage of Lightroom’s file renaming function:
20180727_California_DSF0369. RAF
Now, the file identify tells me that I took the photograph on July 27, 2018, in California utilizing a Fujifilm digital camera. I can nonetheless use the unique filename as a reference.
For extra info on how you can batch rename digital information, please confer with my devoted tutorial right here: Tips on how to Rename Information in Lightroom for Higher Picture Discovery & Group.
FAQ: Lightroom Batch Modifying
Are you able to edit a number of images in Lightroom?
Completely. Lightroom was created as a model of Photoshop for organizing and modifying a excessive quantity of images of digital pictures. Lightroom has distinctive functionalities permitting digital photographers to batch import, batch arrange, batch edit, and export a number of images quick.
How do you batch edit with presets in Lightroom?
There are a number of methods to batch edit with presets in Lightroom. My favourite one is deciding on probably the most fascinating photograph from the latest photoshoot and making use of the develop preset to it. Subsequent, I fine-tune the picture utilizing varied changes of the fitting modifying panel. When I’m pleased with the end result, I take advantage of the ‘Sync’ performance to use all of the modifying steps to the remainder of the images.
Are you able to batch edit in Lightroom cellular?
Regardless that there are usually not some ways for batch modifying in Lightroom Cellular in comparison with Lightroom Traditional, you may nonetheless batch simply.
First, you apply the preset to the chosen photograph. Subsequent, choose the ‘Copy Settings’ possibility from the highest menu.
Lastly, choose a number of photos from the picture folder and use the ‘Paste Settings’ possibility from the highest menu.
All the chosen photos can be edited with the changes from the unique photograph.
What are the advantages of batch modifying?
The 2 major advantages of batch modifying are pace and consistency.
Batch modifying permits you to shortly edit a excessive quantity of images and produce constant outcomes via the complete assortment of photos.
How do I copy the settings to a brand new photograph?
Within the Develop Module, choose the photograph from which you need to copy the settings. Use the keyboard shortcut ‘Management + C’ (‘Command + C’ on Mac), press the ‘Examine All’ button, after which the ‘Copy’ button in the fitting backside nook. Subsequent, choose the subsequent photograph and use the shortcut ‘Ctrl + V’ (‘Command + V’ on Mac) to paste the settings.
Are you able to export a number of presets from Lightroom?
Sure, you may. You’ll be able to export particular person presets in addition to a preset group. Please examine my devoted tutorial right here: Tips on how to Export Lightroom Presets
Tips on how to Batch Edit in Lightroom | Ultimate Ideas
As you may see, should you perceive how you can batch edit in Lightroom, it may be a invaluable device for shortly processing a lot of digital photos. Together with preset-based modifying, you may pace up and streamline the modifying course of in Lightroom even additional.
In the event you incorporate easy strategies to batch modifying in your Lightroom workflow, you’ll spend much less time in entrance of a pc and extra time taking pictures and exploring.
Articles Associated to “Tips on how to Batch Edit in Lightroom (7 QUICK Strategies)“
[ad_2]